Contents
Overview
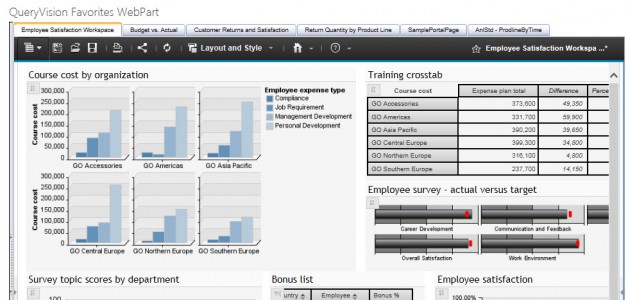
The QueryVision Favorites WebPart Viewer provides Application Authors a way of creating a tabbed dashboard of Reports and other Cognos Content.
Unlike the Cognos Multi-Page portlet component supported by the Cognos SharePoint Web Parts, the QueryVision Favorites Viewer can include Business Insight [Dashboards], Portal Pages, etc.
However, as the intent of the favorites report viewer is to present the latest versions of key reports, portal pages or dashboards, it is designed to either run reports as request time or to present the latest saved output. The following Cognos Content types are not supported by this Web Part. They are supported by the Report Viewer:
- News Items or specific output versions
- Cognos for Microsoft Office Document (initiates a download or launches in a separate browser, so never appears in the viewer)
- Active Report (initiates a download or launches in a separate browser, so never appears in the viewer)
While the part does not allow users to select alternative output types in a web part menu, this option is available through exposing the IBM Cognos “Report Toolbar” (an option in the web part properties/settings.
Configuring the Favorites Web Part
Adding the Favorites Web Part to a Page
You can add a web part to a SharePoint page directly from your browser. If you don’t have the correct permissions some of these steps might not be possible.
- Click the “Edit Page” button from the SharePoint Page ribbon.
- Then click the “Add a Web Part” link and a gallery of web parts will be listed under the Categories section.
- Choose the QueryVision Web Parts category and you will find a list of all web parts for Cognos.
- Select the Favorite web part and the location you want to insert it on the page
Edit the Web Part Properties
On the SharePoint page, select the Page tab, then Edit Page. Once in edit page mode, select the drop down in the top right corner and select to edit web part
The QueryVision extended Web Parts can be found under the “QueryVision” category on the property sheet.
Adding Reports (and other Cognos Content) to a Tab
Adding Reports to the web part is done via editing the page, then editing the web part.
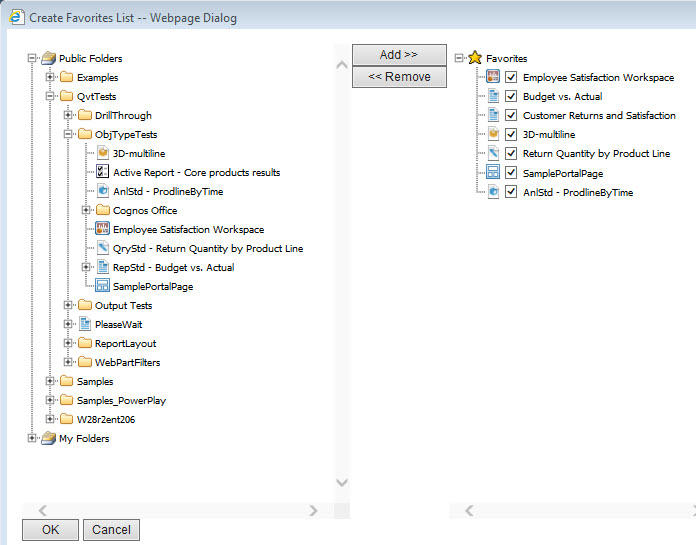
Selecting the Favorites List field and clicking the button (…) beside the field.

This will provide a panel to add, remove and order Cognos reports and content:
Other Properties
Login Page Address:
Enter the URL to a SharePoint Web Page on the same site that contains a QueryVision Login Web Part. This enables the Content Browser to redirect to the a Login Page if it detects that you are currently not logged into a Cognos Server.
Redirect To Login:
When checked the web part will automatically redirect to the Login Page Address when not logged in.
Login Redirect Delay:
Time in seconds before the web part will redirect to the Login Page.
Default Report Execution Mode:
This sets the default mode that report will run as. You can choose between either, HTML, PDF or Output (saved output). Note that saved outputs will retrieve the latest available output.
Interacting with the Web Part
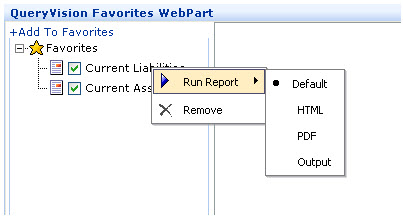
In the screenshots below, it shows Favorites list, which can be used for interactive adding and removing Cognos reports/content and to enable/disable viewing of tabs for each report.
The Favorites list shown in the sidebar allows showing/hiding selected report in a tab (highlighted in red). The report/tab selection list (sidebar) on the left can be shown or hidden by clicking on the sidebar toggle control (highlighted in blue)

The screenshot below shows the list sidebar hidden.
Running Reports:
Multiple reports can be run simultaneously by simply checking the checkbox next to the report name. In this case multiple reports will run simultaneously and appear as separate Tabs in the right hand side of the Web Part.
You can set the output format of the report by Right-Clicking on the report name, choosing “Run Report”, and then choosing the output format from the context menu. These settings will be saved between sessions.
Choosing Default will use the setting that you have chosen in the Web Part properties window.