Notes:
- The latest version PDF version of the installation guide can be found here: QueryVision Web Parts Installation Guide
- This article provides a basic installation guide. For a more complete description, including the various authentication options or for specifics for IBM Cognos Analytics 11+ – see the PDF guide
Integrating Cognos and SharePoint does not take very long with QueryVision Web Parts. The installation and deployment process can be done in less than 15 minutes.
Quite frankly reading the documentation and gathering the information you need usually takes longer!
Lets start with a quick overview of what the steps are and then we can explore each step in detail.
- Gather Your Cognos Server Information
- Run the Setup
- Edit your QueryVision configuration file
- Deploy the QueryVision Web Parts
- Install your QvLicense.lic (license file)
- Go to a site and drag and drop your web parts onto a page
Gather Your Cognos Server Information
We first need to gather 3 pieces of information by accessing Cognos Configuration, or by asking your Cognos. If you don’t know what Cognos Configuration is or don’t have access to it then you can ask your friendly Cognos administrator to send this to you.
- IBM Cognos Gateway URI
- IBM Cognos Dispatcher URI for External Applications
- IBM Cognos Namespace (for authentication)
- IBM Cognos Version
As mentioned above you can get this information directly if you have access to the IBM Cognos admin tool called “Cognos Configuration”. If you launch it and click on the “Environment” node over on the left hand pane.
This should give you a screen that looks somewhat like the following. Make note of the two URLs (also known as URIs but don’t worry about that). One thing that you need to be absolutely careful about is that if it says “localhost” for the domain / server name you will need to change this to reflect the proper server name when we make our changes in our configuration file.
Next click on the Cognos Authentication Namespace in the Cognos Configuration application. You will probably have just two entries here. You are looking for the one that is not named “Cognos”.
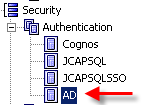 In this example I am choosing the one named AD which is our Active Directory Namespace. If you use Active Directory in your company it is likely that this what you want.
Go ahead and select the namespace.
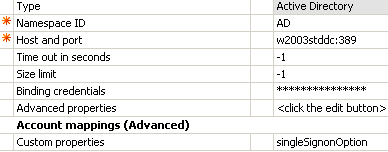
Notice that the Cognos Namespace has a property known as the “Namespace ID” we will need this ID in our configuration step, so note it down.
You should now have 3 pieces of Cognos information written down somewhere. The two URIs above and the Namespace ID.
Run the QueryVision WebParts Setup program (.msi file)
To be clear, our setup program is just a simple install that basically unpacks a bunch of files on to your computer. It does not modify your computer in any way nor does it “deploy” or “install” anything into your SharePoint site.
What I mean here is that depoyment is where the real changes to your SharePoint site happen. This is a couple of steps down from here.
Once we simply run the install we will have a couple of shortcuts in the Windows Start Menu.
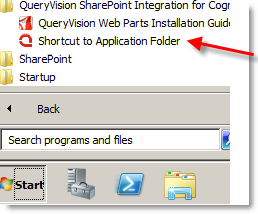
Once you are finished running the setup, simply click on the “Shortcut to Application Folder”. This basically will take you to the folder where you installed / unpacked our QueryVision Web Part setup files.
By default this folder is “C:\Program Files (x86)\QueryVision\QueryVision SharePoint Web Parts”, unless of course you changed the default when you ran the setup.
Clicking on the shortcut should bring you to the above folder. You should see a folder with a Package folder and a Configuration folder.
Edit the QueryVision Configuration File
We are now ready to edit our QVTConfig.xml file. This file resides in the “Configuration” folder. Go into this directory and open the QVTConfig.xml file in any text editor. You can use notepad, an xml editor or something like Visual Studio of you have it. I prefer Visual Studio only because it color codes the file and makes it easy to read. But any text editor is fine.
We are now going to use the Cognos information we gathered above to configure which Cognos servers our SharePoint users will connect to. You can configure as many of these as you want, however we are just going to do one here as a sample.
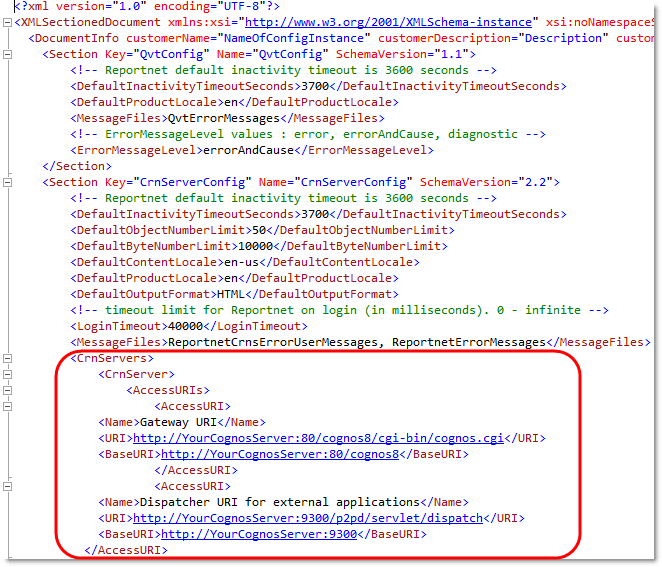
After opening the file, find the <CrnServers> section. Note that right underneath this we have already defined a default <CrnServer> for you. As mentioned above we can have as many “CrnServer” sections as we like. Each CrnServer section defines how to connect to a single Cognos Server instance.
The QvtConfig should look something like this. Find this section and then enter in your own Gateway URI and Dispatcher URI for external applications. The BaseURI for each also needs to be changed to reflect the right server name (if you look it is just a shortened version of the same string)
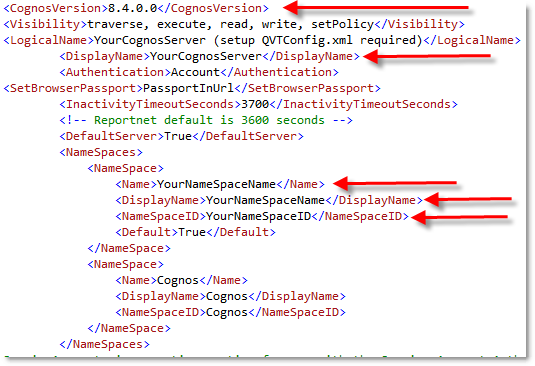
Next we scroll a little further down to in the file to the following section. There are 5 changes (marked with arrows below) that we need to make. Don’t worry they are easy!
Here are the changes:
- Change the CognosVersion to be the major version of Cognos (8.4, 8.3, 8.2, 10.1, 10.2, 10.2.1 etc.). Note that this is NOT the build number (e.g. the build for Cognos 10.2.2 FP2 is 10.2.6102.54 – what is required is 10.2.2). For the official list of Version vs. Build numbers, see the following: How to determine the Build number of a Cognos Version
- Change the DisplayName to be whatever you want to name your server (your users will see this name), but it can be anything you like.
- Change Namespace “Name” field to be anything you like.
- Change Namespace “DisplayName” field to be anything you like. Again users will see it but it can be something like “AD” or “ActiveDirectory”. I almost always make the Name field and DisplayName the same thing.
- Lastly and most important here is to make the NameSpaceID exactly match the NamespaceID field we got above from Cognos Configuration.
Save the QvtConfig.xml file in your Configuration folder. I suggest you make a backup of the orignal just in case you need to go back to it. But worst case is that you can re-run the setup and get a fresh copy.
OK – we are almost there. Take a sip of coffee……
We now have to deploy the webparts into SharePoint 2007 or SharePoint 2010 / 2013 / 2016.
Deploy QueryVision Web Parts into SharePoint
For this step we need to make sure we have administration access to the SharePoint server (not just the machine but in SharePoint as well). You will be using the Stsadm command-line tool that is part of SharePoint Office Server to deploy the web parts.
If you look in the “Package” folder in our install location there are two different packages. One for SharePoint 2007 and another for SharePoint 2010/2013. You can tell by the name of the file which is which. Make sure you deploy the correct one or else you will definitely get some unexptected behavior.
We are going to go through the commands for SharePoint 2010/2013, the actual stsadm commands are the same for SharePoint 2007 but there are some just some small tweaks that you need to make, which will be obvious in a second….
Open a command prompt (as administrator) in the “Package” folder. This folder contains our two soution files (.wsp files). One for 2007 and another for 2010 / 2013 / 2016.
Firstly we set the path to the stsadm directory (or you could “cd” to that directory). Note that the path for 2013 has the “\15\” hive in it whereas for 2010 the directory or hive is under “\14”. This is just the alternate version number Microsoft uses.
@set PATH=C:\Program Files\Common Files\Microsoft Shared\web server extensions\15\BIN;%PATH%
Next we add the solution to the SharePoint Server
stsadm -o addsolution -filename QueryVision.Webparts.Install.2010.wsp
Now we force the Timer jobs to execute (you don’t have to do this step but if you don’t it is possible that the last command will not run for a while (it is set in a queue).
stsadm -o execadmsvcjobs
Now we deploy the webpart solution to a specific server. We want to deploy to all of the Web Front End servers in our farm. So if you have more than one you can go through this multiple times or you can look at using the “allcontenturls” option with stsadm.
For a single url we do the following (the url is the virtual server URL we are deploying to) for SharePoint 2010
stsadm -o deploysolution -name QueryVision.Webparts.Install.2010.wsp -immediate -allowCasPolicies -url http://localhost -allowgacdeployment
For SharePoint 2013 this differs by one parameter:
stsadm -o deploysolution -name QueryVision.Webparts.Install.2010.wsp -immediate -allowFullTrustBinDlls -url http://localhost -allowgacdeployment
Note: the name of our package is QueryVision.Webparts.Install.2010.wsp (for both 2010 and 2013) if you are deploying to 2007 then make sure you use the 2007 .wsp file instead.
Now run our timer jobs again…
stsadm -o execadmsvcjobs
Finally we activate the features (which puts our web parts in the gallery so that you can browse and drop them on a page)
stsadm -o activatefeature -name QueryVisionWebParts -url http://localhost
Now just in case you ever need to do this again or you need to undo what we just did above, you would run the following commands before doing this again.
Such as the following to “uninstall”….
stsadm -o deactivatefeature -name QueryVisionWebParts -url http://localhost

stsadm -o retractsolution -name QueryVision.Webparts.Install.2010.wsp -immediate -allcontenturls

stsadm -o execadmsvcjobs

stsadm -o deletesolution -name QueryVision.Webparts.Install.2010.wsp -override

stsadm -o execadmsvcjobs
and then the commands we did above for SharePoint 2010 to “install”..
stsadm -o addsolution -filename QueryVision.Webparts.Install.2010.wsp

stsadm -o execadmsvcjobs

stsadm -o deploysolution -name QueryVision.Webparts.Install.2010.wsp -immediate -allowCasPolicies -url http://localhost -allowgacdeployment

stsadm -o execadmsvcjobs

stsadm -o activatefeature -name QueryVisionWebParts -url http://localhost
Note: if re-installing, you need to re-update the web.config file for CAS permissions (see below)
or SharePoint 2013 “install”…
stsadm -o addsolution -filename QueryVision.Webparts.Install.2010.wsp

stsadm -o execadmsvcjobs

stsadm -o deploysolution -name QueryVision.Webparts.Install.2010.wsp -immediate -allowFullTrustBinDlls -url http://localhost -allowgacdeployment

stsadm -o execadmsvcjobs

stsadm -o activatefeature -name QueryVisionWebParts -url http://localhost
You can copy the two sets of commands above into a batch file and then run them from your package folder just to make things easy. Remember to edit this file with the right package name (.wsp file) and the right URL.
Behind the scenes a bunch of things have happened. You web.config would have been updated. Under the “Safe Controls” list you will find a few QueryVision assemblies that have been added. A backup of your web.config also would have been made as well.
Edit Your Policy File (Skip this step if using SharePoint 2013/2016)
Secondly, your Code Access Security (CAS) policy file has been backed up and modified to allow some new privileges assigned to QueryVision web parts to allow them to run and access Cognos remotely.
We need to manually edit this file to turn on this permission. The way to do this is simply to browse to your SharePoint directory under the following directory.
"C:\Program Files\Common Files\Microsoft Shared\Web Server Extensions\14\CONFIG"
Find the latest file that has been modified. It should be something like “wss_custom_wss_mediumtrust.config”. The name of the file could be something else and if you really can’t find it you can actually look in your web.config file to determine which policy file is actually in effect.
To do this open your web.config file. Find the following entry
<trust level="WSS_Custom" originUrl="" />
In this example the name of our trust level is “WSS_Custom”. Now find the entry called “trustLevel” and it will tell you exactly which file is actually being applied as your CAS policy file (it is only one of these)
For example by matching the name from the following entry I find that the LAST entry is actually my policy file.

So now go and open your policy file in a text editor (notepad will do), and find the following entry (where 123456 is actually some unique number:
<CodeGroup class="UnionCodeGroup" version="1" PermissionSetName="queryvision.webparts.install.123456">
Change the PermissionSetName to “FullTrust”. Like so…
<CodeGroup class="UnionCodeGroup" version="1" PermissionSetName="FullTrust">
Close and save the file.
Lastly our deployment also installed the appropriate files (assemblies and supporting files) will be added under your virtual server directory (e.g. c:\inetpub\wwwroot\wss\virtual directories\80\ ). Under your virtual directory find your “resources” folder. In this you will find a deployed copy of our QVTConfig.xml file.
Remember that file that we edited above with the Cognos info in it? That’s the one.
We want to take our edited copy and overwrite the one in your virtual directory with this one.
This will update the web parts to use your specific Cognos server settings. You should be now ready to go to a page and add some QueryVision Web Parts onto a page and start testing.
In our next article we will cover more on just that… adding web parts to a page configuring them and using them to view and filter reports, setup dashboards and a whole range of other features.
Install your License File
Whether you are doing an initial Trial or are installing for production use, you will need a one or more license files to be installed in the same folder as the QvtConfig.xml file. See Web Part Licensing for details.


