This article focuses on setting up our SharePoint Web Parts for Cognos integration.
After running through our installation and deployment for QueryVision Web Parts you are well on your way to having Cognos integrated directly into SharePoint. If you have not installed and deployed your web parts yet make sure you read through the install manual or you can read our quick installation guide before proceeding.
The first step in getting going is to add one of our Authentication web parts to a page. After all if we aren’t logged into Cognos we aren’t going to really see anything interesting.
Let’s start with our Challenge / Response Authentication web part. This just means that this web part will challenge us for our credentials (username / password). We respond and then voila we get logged in.
You have the ability to use Single Sign On so that your users don’t have to enter any credentials, which is a different web part that we offer. We will cover all of the different security and authentication options for Cognos in another post. For now let’s just keep things simple.
We will add the QueryVision Authentication Web Part (aka our challenge and response web part) and then we will login, and add our Content Manager navigation web part so that we can verify we are in fact logged into Cognos (by browsing and navigating through content).
To get started we are going to use two different pages. On the first SharePoint page we are going to add an authentication web part that we will use to login to Cognos.
The second page will hold our Navigation (content browser) web part. The reason we will do this is because we typically want to have a single page for login and then put Cognos Content on other pages (such as navigation, report viewers, dashboards etc.). This is basically because we only want to visit the login page once in a session and then forget about it.
As you are probably aware there are so many different ways to create pages in SharePoint and so many different templates that you can use (as well as build and design yourself).
For the purposes of this article I am going to just create a simple page and put it in a document library from the standard templates that come out of the box.
Enough talk… let’s get started.
Contents
- 1 Step 1: Create a Document Library
- 2 Step 2: Add Web Part Pages to the Document Library
- 3 Step 3: Add QueryVision Authentication Web Parts to a Web Part Login Page
- 4 Step 4: Create Another Page to hold your QueryVision Web Parts with Cognos Content
- 5 Step 5: Configure our Web Parts to Point to the Login Page
Step 1: Create a Document Library
Now remember you don’t have to do this. I do it out of convenience. Web part pages can exist anywhere, but I want to put them in a document library for easy access.
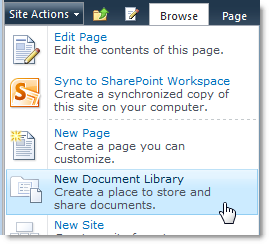
Browse to your SharePoint 2010 site. Then up in the ribbon Click on Site Actions -> New Document Library
Next fill in the Name and Description and select “Web Part Page” as your document template. This will set the default to documents to be web part pages for this particular document library (however you can still add other types of documents to this libary if you wish).
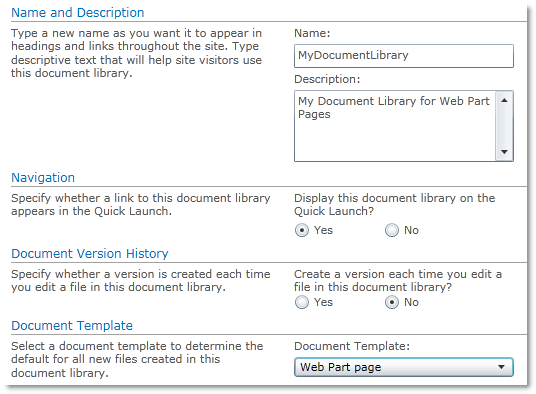
You can also choose whether or not to version your documents (this is entirely up to you). This functionality gives you check-in / check-out capabilities. For our purposes right now this is not really required. After you are done just click Create.
Your document library should get created and you should be in the library. You will notice that since we chose to put it on the Quick Launch bar it should be listed on the left hand side as well for easy navigation back to it.
Step 2: Add Web Part Pages to the Document Library
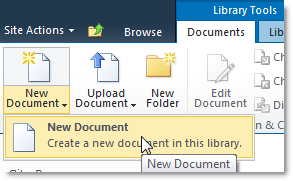
Click on “Documents” in the ribbon and then New Document.
You will now be presented with a Web Part Page creation dialog. Just fill in the name of the page as well as which template you would like to use. Since we are placing just a simple Login web part on the page it really does not matter which template you pick for now. The different templates present you with different layouts of Web Part Zones. Web Parts can then be dropped into the different zones in order to layout the page.
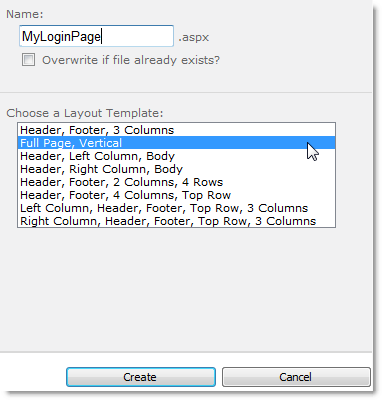
Again just click create and we are done. You have now created a document library and in it you have created a blank Web Part Page.
Step 3: Add QueryVision Authentication Web Parts to a Web Part Login Page
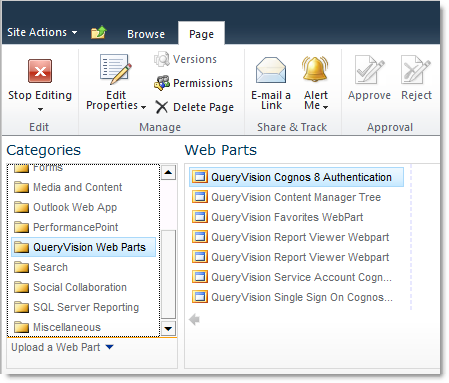
Your QueryVision Web Part install has already placed your web parts into your SharePoint “gallery”. All that this means is that when you click on “Add a Web Part” on the page you will get a list of web parts that you can add. The list is the gallery, and in that gallery you should see a Category (which looks like a folder on the left called “QueryVision Web Parts”. In the case of SharePoint 2007 things look different… you just simply scroll down the list and you should see a heading under QueryVision Web Parts with all of the available web parts.
We are going to choose the “QueryVision Cognos 8 Authentication Web Part”. Now before you ask “does this support Cognos 10?” Yes it does, we should not have put the “8” embedded into the name, and will likely be changing that in the near future…. sorry for that!
Once you select the web part, you can choose which zone to add to and then click the Add button over on the right hand side. If you put it into the wrong zone, no worries just drag and drop it to your desired location afterwards.
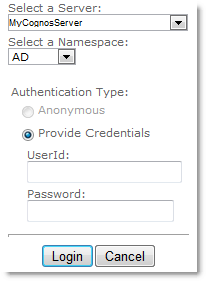
If all is well with your installation and deployment then you will be presented with the login web part…. just like below.
You now have a login page of sorts that you could send your users to get logged in to Cognos. All other QueryVision web parts will stay logged in for the duration of their session while they continue to browse through SharePoint content.
After users fill in their credentials and log in the web part will hide itself and be “minimized”.
Step 4: Create Another Page to hold your QueryVision Web Parts with Cognos Content
Our next step is to go and create another Web Part page just as we did above. I called mine “Navigation” because we are going to put our Content Manager Tree web part for navigating Cognos content on this page. You can add other web parts like the QueryVision Report Viewer on this page as well.
So go ahead and create another page, and then click on Add Web Part again.
This time choose the QueryVision Content Manager Tree web part and add it to the page.
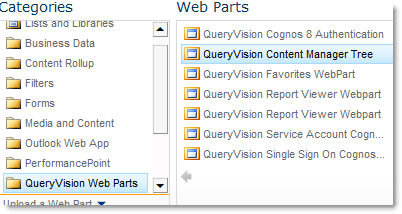
If you logged in earlier to our Authentication Web Part you should see the tree as below. If you are not logged in it will tell you so.
 You can now navigate through all of your Cognos content without ever leaving SharePoint.
Note that the content you see is within the security context you logged into Cognos as. Which basically means that you should be able to browse your content just as if you were logged into Cognos Connection directly as that same user.
Step 5: Configure our Web Parts to Point to the Login Page
Our last step, is to setup up the Content Manager tree to direct users to the Login page if they are not initally logged in. If that is not clear, it will become apparent in a second.
First, let’s go get the URL of the previous page we created which is our Login Page URL. You can simply browse back to the previous page we created with the Authentication web part on it, and then copy the URL from the address bar in your browser.
Now we can edit the Content Manager Tree properties. We do this by clicking in the top right corner of the web part (which brings up the following menu).
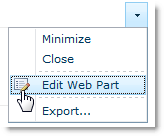 Click on the “Edit Web Part” menu option.
This will open a tool pane on the right hand side of your screen, which will allow you to edit all of the properties for the Content Manager Tree web part.
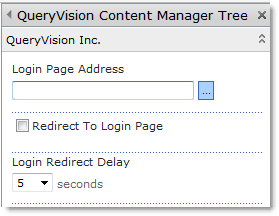 All QueryVision web parts have these shared Login Page Address properties.
Paste the URL you just copied above into the Login Page Adress. You can also check the “Redirect to Login Page” checkbox. Set the redirect delay to any desired amount.
Click ok and you are done.
Now when a user is not logged in and they come to a page which has this Content Manager Browser on it, they will automatically be redirected to the login page. The redirect delay is the amount of time to wait until the redirect.
This is much better than just leaving them with a “You are not logged in” message with no clear idea where to go.

After the user is redirected they can login and they will be automatically redirected back to where they came from.
If you follow this procedure with all of your QueryVision web part then you will never have to worry about users getting lost.
They can go directly to a dashboard with Report Viewer web parts be redirected to login and then redirected back again.
You can do the same thing with the Single Sign On web part, in which case the whole process is taken care of without the user clicking or entering in any credentials.
