
Contents
Set up Cognos 10.x/11.x as Single Sign On
SSO from SharePoint to Cognos requires that Cognos must be configured with an Authentication Namespace with Single Signon enabled. In other words, users should not be challenged for credentials when they use a browser to go directly to Cognos Connection.
This requires changes to the Authentication options. For example the following shows the configuration for Active Directory. This must be made using the Content Manager (server) configuration tool.
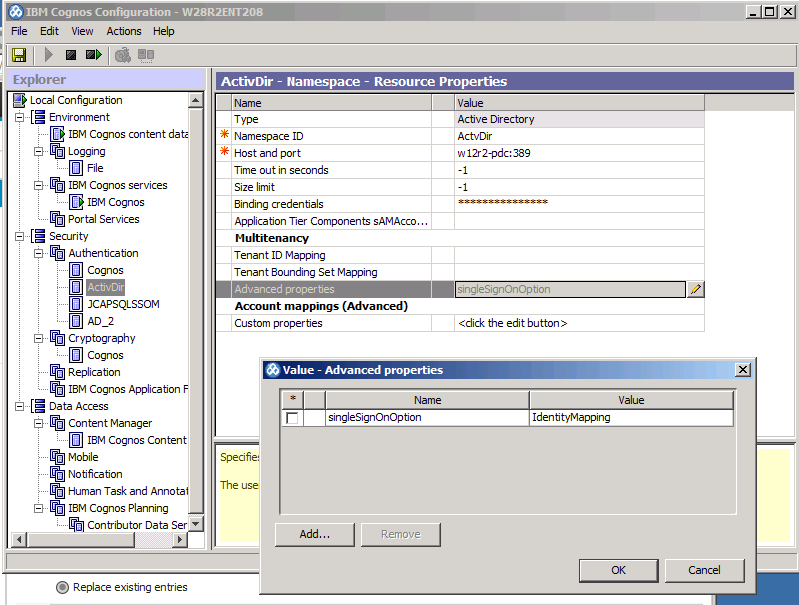
- Select Advanced properties
- Add or update the property name/value – case sensitive
Name: singleSignOnOption
Value: IdentityMapping
Notes:
- A Cognos namespace cannot support non-SSO and SSO at the same time.
- Multiple namespaces can be configured using the same Authentication Service (e.g. Active Directory) so there could be SSO and non-SSO support for a single Active Directrory service.
- There is a catch: Cognos will treate the same AD user coming in from SSO and non-SSO namespace configurations to the same AD service as different users
- QueryVision can allow web parts to sign on in both non-SSO (Challenge/Response) or SSO when the Cognos namespace is configured for SSO
Preliminary Instructions for QueryVision for All Options
The following steps must be performed for all SSO options below to function properly. You must perform the steps in this section regardless of which SSO options you are attempting to setup.
A JSP file and an XML file must be installed / copied onto your Cognos Application Server. The SSO Login web part uses these files directly. Follow these steps to install the JSP file on the Cognos Server.
- Locate the QueryVision install folder, and then find the “Configuration” Folder, it should look something like this:
"*QueryVision Install Folder*\QueryVision SharePoint Web Parts\Configuration"
- Locate the file “ssonrd.jsp” in the following folder on your SharePoint Server:
- Copy this file to the following location on all Cognos Application Servers and Cognos Content Manager Servers (if these functions are installed on separate Machines)
"*Cognos Install Directory*\...\webapps\p2pd"
Next, copy the file “QvtSsoParams.xml” to the Cognos Server:
- Locate the files “QvtSsoParams.xml” in the QueryVision Configuration Folder:
- Edit this file by replacing the url to your Cognos Server with the correct one. (e.g. replace the http://YourCognosServer:9300/p2pd/ssonrd.jsp with the proper Server Name for your Dispatcher).
- Copy this file to the following location on all Cognos Application Servers and Cognos Content Manager Servers (if these functions are installed on separate Machines)
" *Cognos Install Directory*\...\templates\ps"
Edit the QvtConfig.xml Configuration File
The remaining settings are done within your “QvtConfig.xml” configuration file. This file is deployed to your SharePoint virtual directory within the “Resources” folder. Typically this is under “C:\inetpub\wwwroot\wss\VirtualDirectories\80\”.
We always suggest making a backup of this file before proceeding with changes!
Standard SSO
Authentication Setting:
Within QVTConfig.xml ensure that your “Authentication” value is set to “Account”.
Namespace Settings:
Your Namespace setting should be setup to correspond to the namespace that is setup for single SharePoint Web Parts for IBM Cognos signon within Cognos. Remember that to avoid a namespace prompt you can only have a single namespace defined within the Cognos Gateway. The NetbiosDomain is not applicable and can be left alone or made blank.
You should end up with something like the following:
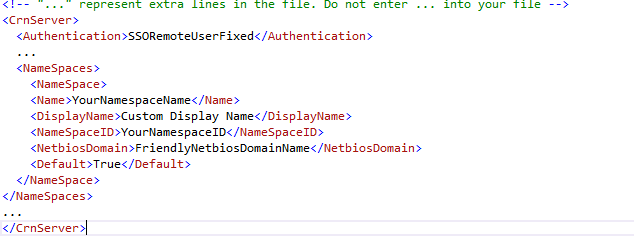
Remote User Fixed
Authentication Setting:
Within QVTConfig.xml ensure that your “Authentication” value is set to “RemoteUserFixed”.
Namespace Settings:
Your Namespace setting should be setup to correspond to the namespace that is setup for single signon within Cognos. You can have multiple Namespaces configured on a Cognos Server, however in this case you are directing ALL traffic to only one particular Namespace for authentication. The Namespace that is listed as the “Default” namespace will be used for all SSO interaction. The NetbiosDomain is not applicable and can be left alone or made blank.
You should end up with something like the following:
Remote User Lookup
This option allows for multiple namespaces defined in Cognos to be used in conjunction with multiple Active Directory Domains. The actual Cognos Namespaces can point to each AD domain but they can also be used with other Authentication Namespaces such as LDAP.
Users authenticating in the form of “Domain1/user” will be directed towards “NamespaceA” and “Domain2/user” will be directed to “NamespaceB”. Remember that the client domain is being used in this case for the lookup. This is the Domain that users authenticated against for Windows Client (which is not necessarily the same as SharePoint).
Authentication Setting:
Within QVTConfig.xml ensure that your “Authentication” value is set to “RemoteUserLookup”.
Namespace Settings:
Your Namespace setting should be setup to correspond to one or more namespaces that have
been setup for single signon within Cognos. In this case you can have multiple Namespaces configured on a Cognos Gateway, a domain lookup will be matched with the appropriate namespace in Cognos and used for authentication. The NetbiosDomain must be set to the appropriate matching Domain you wish to authenticate
against.
You should end up with something like the following:

SSO Dynamic
This SSO option is the most flexible option, and accounts for multiple namespaces defined in Cognos, which correspond to multiple Active Directory Domains. The context of the user as it exists in SharePoint will be used for Cognos. This means that whoever you logon as for SharePoint will be the same domain/user used to automatically signon to Cognos. Due to the complex nature of this option, there are a number of extra steps that are required to have this installed and configured properly.
Note: For more details and latests copies of guides, see the following PDF documents:
Install The QueryVision Trusted Signon Provider:
Within your QueryVision install directory you will find the following files under the “Configuration” folder, each of these files needs to be installed into specific folders on the Cognos Server:
| File Name | Cognos Server | Destination Folder on Cognos Server |
|---|---|---|
| qvtSSODynamic.html | Cognos Application Servers & Cognos Content Manager Servers | ..\webcontent |
| JDBC_Config_JCAPSQLSSOM.properties | Cognos Content Management Servers | ..\configuration |
| CAM_AAA_TrustedSignonJCAPSQLMulti.jar | Cognos Content Management Servers | ..\webapps\p2pd\web-inf\lib |
To select the appropriate version of CAM_AAA_TrustedSignonJCAPSQLMulti.jar, please see the document QueryVision SSO Dynamic Trusted Sign On Provider Guide in the QueryVision Web Part installation folder ../Configuration/Advanced Single Signon/Trusted Signon Provider.
Namespace Definition on Cognos Server:
In order to complete the setup the Cognos server needs to have a special namespace defined which points to the QueryVision Trusted Signon Provider. This provider will handle the brokering as to which namespace to authenticate the user into.
- Launch Cognos Configuration
- Under “Explorer” on the left hand side right click the “Authentication” tab under Security, and then choose “New Resource” and then “Namespace”.
- For the Name type in “JCAPSQLSSOM” and then choose Custom Java Provider from the drop down list, and click OK.
- Enter the NamespaceID value on the right hand side as “JCAPSQLSSOM”
- Enter the Java Class Name as “TrustedSignonJCAPSQLMulti”
- Click Save, to save your new Namespace definition
- Lastly, you may have to stop and start your Cognos server for the changes to take effect.
Setup a Shared secret:
A shared secret must be setup between the SSO Web Parts on the SharePoint server and the Trusted Signon Provider on the Cognos Server. This ensures that all URLs are encrypted and expire (can only be used for a limited amount of time). In order, to set up a shared secret you must use the QueryVision Key Generation tool, and then
copy this key to both your web part configuration file and your trusted signon provider properties file.
- Locate the ConfigurationAdvanced Single SignonKey Generation Tool folder under your QueryVision Install Directory.
- Open a Command Line Prompt as Administrator and type “cd” followed by the above directory (e.g. “cd c:program files (x86)QueryVisionQueryVision SharePoint Web PartsConfigurationKey Generation Tool”)
- Type “BcKeyGenerator <>”. Where <> is any random alphanumeric string.
Note: the pass phrase does not need to be secure, however we suggest something random. - A file will automatically be generated within the same directory of the form “bcKey_datetime”.
- Open this file in Notepad. You will find your key as a single line of text.
- Copy this key to the clipboard.
Keep this key on hand as you will need to place it into two files. - Open your “JDBC_Config_JCAPSQLSSOM.properties” file that you installed on your Cognos Server using any text editor (like Notepad)
- Locate the entry “bcEncryptKey=” and replace the default key with your new key that you generated.
Close and save your .properties file. - Open your QvtConfig.xml file on your SharePoint server under the Resources directory where you deployed your web part solution to.
- Locate the entry and replace the default key with the key you generated.
E.g. YourNewKeyValue Save your file - Save your file.
Authentication Setting:
Within QVTConfig.xml ensure that your “Authentication” value is set to “SSODynamic”.
Namespace Settings:
Your Namespace setting should be setup to correspond to one or more namespaces that have been setup for single signon within Cognos. In this case you can have multiple Namespaces configured on a Cognos Gateway; a domain lookup will be matched with the appropriate namespace in Cognos and used for authentication.
The NetbiosDomain must be set to the appropriate matching Domain you wish to authenticate against.
You should end up with something like the following:
Note: Users authenticating in the form of “DomainName1/user” will be directed towards “NamespaceA” and “DomainName2/user” will be directed to “NamespaceB”.
Testing:
You can test your server by logging into different domains / namespaces using different users on
the network. You can also test that you can logon to your desktop under one domain (or under a
local account) and then logon to SharePoint as a different account. The QueryVision Single
Signon web part will now automatically logon as the SharePoint user.