
One of the hidden gems of the QueryVision Report Viewer Web Part is that it has the ability to receive parameters and prompts that in turn drive filters in your Cognos Reports. This enables you to quickly setup a Cognos Dashboard directly within SharePoint using Cognos content as well as other data sources.
This is accomplished using Filter Provider Web Parts that are part of SharePoint and configuring them to send filter values to the QueryVision Report Viewer. Once this is done prompts or parameters will be sent to your Cognos Report when users choose values from your Filter Provider Web Part. What end users will see is a simple page with a prompt and a Cognos Report directly within SharePoint.
This might sound complicated but it is very simple to setup. All of this is accomplished without any coding, and entirely done within a browser.
Before we get to the “how to” part of this article, it might be worthwhile explaining a little about SharePoint’s Filter Provider Web Parts. Since SharePoint Server 2007, Microsoft has shipped a number of out of the box filter web parts.
The purpose of these web parts is to provide filter or search criteria to other web parts in order to filter data. This is accomplished by “connecting” web parts together. Filter web parts can provide a user interface to allow users to pick items or dates for instance, but they can also be hidden and run in the background on a page.
Some simple examples are the Date Filter, which provides a very common Calendar interface for users to pick a date, or the Choice Filter which allows a user to select an item (e.g. a Country, or Product) from a list. When a user selects an item from the filter web part the selection is sent to the connected web part which in turn filters its data. You can connect Filter Web Parts to SharePoint Lists, Excel Reports, or some 3rd Party Web parts (such as ours).
Hopefully you get the idea… so enough of the boring preamble let’s get started and connect a Filter web part and drive those parameters into our Cognos Report without leaving SharePoint.
STEP 1 – Setup up the Report Viewer Web Part:
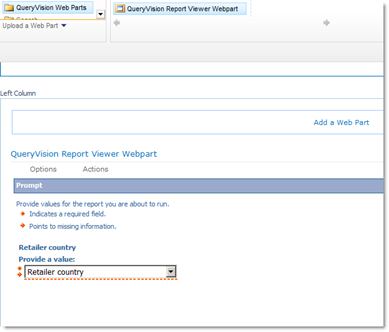
Create a new web part page or select and existing one, click Edit Page from the ribbon. Now click on Add a Web Part and select the QueryVision Report Viewer Web Part and then Click Add. A new Report Viewer Web Part should now be visible on your page. Now Edit the properties of the web part and click in the “Report Path” text window and select the […] button to browse for a Cognos Report. Make sure to choose a report that has a Prompt or Parameter. The report should run and come back with a prompt directly from Cognos.
STEP 2 – Add a Choice Filter Web Part
Now while you still have the page in edit mode, add another web part. Browse to the category “Filter” and select the “Choice Filter” and add it to the page by hitting the Add button. 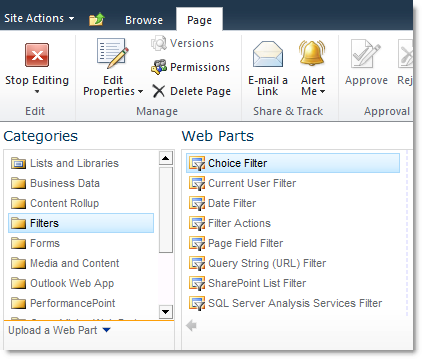
STEP 3 – Setup Up the Choice Filter Web Part
We need to configure the choice filter to have selection values for the user to pick. Remember that not all filter web parts require this. Some can be dynamic and get their values from a database or another list. This particular web part requires an author to enter in a set of choices for the user to pick from.
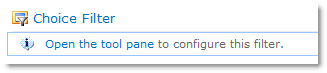
Click on the “open the tool pane” link to edit the filter.
In my example I am dealing with Retailer Countries as the prompt coming back from Cognos. So I have entered in country names as my values. You will likely have something else. Simply choose a few values that Cognos was prompting you with and enter them in on a separate line in the text box. You can also name the Title whatever you would like the user to see as the caption of the prompt. After you are finished, just click on OK to save our properties.

STEP 4 – Connect Our Web Parts Together
Finally, we want to connect our web parts together so that the selection that a user picks in the choice filter will be passed to the QueryVision Report Viewer web part (and of course on to the Cognos Report).
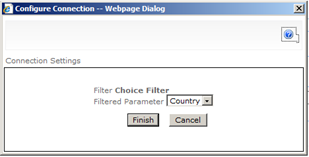
Now click on the ChoiceFilter Web Part arrow (in the top right corner) to bring up its menu. From the Connections menu select “Send Filter Values To” and then select “QueryVision Report Viewer Webpart”.
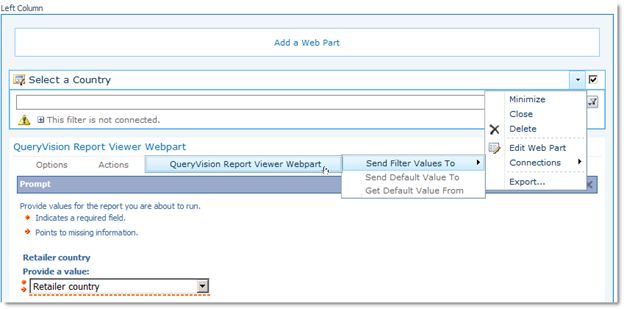
This will bring up a Connection Settings dialog box. Simply choose the parameter that is listed in the drop down box (you may have more than one in the report), and then click on Finish.
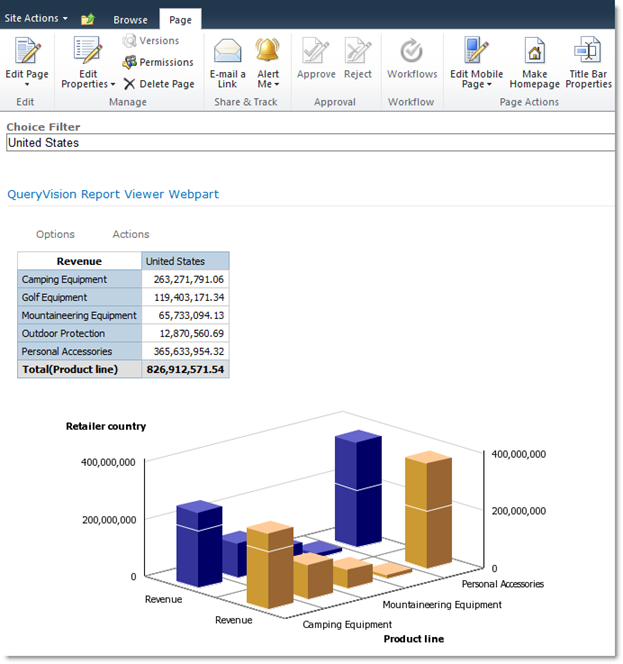
The Finished Product…
Now you can flip your page back to normal mode by clicking the “Stop Editing” button in the ribbon, and you are done!
When a user now browses to the page they can select a country from the Filter and the report will run with that filter value.
Other Options:
You may also want to configure the default value for the Choice Filter to force a default value for the report amongst other options.
You can also play with the Force Parameter Level on the Report Viewer Web Part properties. This allows you to force a user to pick a prompt value before the report runs. In other words, you can make sure no prompts come back natively from Cognos if they are not filled in yet.
Remember that this is just an example. This type of functionality allows you to connect multiple Cognos reports on a page to the same prompt. Furthermore, you can connect your prompts to mixed content (i.e. a Cognos Report as well as a filter for a SharePoint List) simultaneously.